This post is under construction.
This post is about the setup of a
pfSense 2.0 firewall in
transparent mode to connect and protect virtual machines hosted by
OVH to the internet.
OVH provides
failover IPs (
fr) and
RIPE IP Failover block (fr). These IPs and blocks can be re-routed between servers you are renting inside an OVH datacenter in 1min.
This make migration, failover and HA easy and at a low cost, no need to change something in the DNS or in the VM setup.
The setup and the use of these IPs is not easy. Adding a firewall in between don't help.To not increase the complexity of this post, the firewall is configured in
transparent mode. This means that interfaces of the firewall are
bridged.
What is a bridge ?
A network bridge fits between two networks and repeats Ethernet frames on one side to the other side and vice versa. A bridge works at layer 2 (Ethernet) of the
OSI model (IP is layer 3) and ignores the IP settings. All type of Ethernet frames are forwarded by the bridge, even theses that encapsulate packets that are not related to the IP protocol. Bridges are smart and learn MAC addresses on both side to avoid to repeat frames that don't need to cross from one network to the other.
Promiscuous mode
If you are using an
hypervisor like VMware ESXi or Xen, you have to enable the
promiscuous mode on each interfaces of the bridge to allow it to see all Ethernet frames and guess host on each side.
Here is the procedure for VMware, ask Google if you use another hypervisor.

pfSense and bridging
The bridge connects multiple interfaces. Each of these interfaces can have an IP address, but this is not required. The Bridge itself can be attached to a network interface and have an IP address, but this is not required either. Here the goal is not to combine two networks in one but just to connect them without wasting any IP addresses or increasing complexity. Frames that contains IP packets can be filtered by the firewall rules. Here I'll bridge the WAN and the OPT1 (DMZ) interface. The LAN will be kept out of the bridge.
pfSence can filter at the bridge level, but we want to filter at the
member level. Check in the advanced settings of your FW that your setup match this one:

When do you need to allocate an OVH virtual MAC for your VM
I think the main purpose of the virtual MAC at OVH is to avoid MAC address conflict. This could be very annoying if your production server would stop working because someone is installing a new VM using a random MAC address that match your ! In the mean time they can use this to reinforce the security of their network.
Most of the time when you attache a failover IP to a virtual machine then you need to allocate a virtual MAC for this VM. But his is not always true. For example if you are attaching a second IP to an existing VM using the IP Alias approach, you don't need one because this second IP will use the MAC address of the primary address. Also If your VM is behind a router doing some Proxy ARP, the router use its own MAC address to masquerade your IP and the other side of the router it will be happy with any MAC address used by your VM.
This could be counter productive to allocate a MAC address when not needed, the OVH infrastructure could block the traffic when the MAC don't match the IP address. And if their are not doing that today they could do it later.
In the configuration bellow, you need to allocate a virtual MAC address for VMs going in the DMZ and for the firewall itself if you give it an IP address. No need of virtual MAC for VMs going in the LAN.
Giving a routable IP address to the firewall or not ?
Even if the bridge mode allows the firewall to do its job without giving it any IP address, the firewall need one to be managed using a web browser.
For the
early setup and for
emergency access, I have the use to create a VM using a
XUbuntu LiveCD distibution on the LAN side and use the VMware console to manage the firewall. The Firewall LAN side is configured with default address 192.168.1.1 and a working DHCP server, this make the network setup of the VM very easy. Just connect your browser to
http://192.168.1.1, use admin / pfsense for login / password and you are in.
Giving a routable IP to the WAN side of your firewall would allow you to
remotely manage your firewall and do
hide NAT (masquerading) for the VMs connected to the LAN side (if any). This also allows you to
upgrade and
install new packages.
The challenge
Here is the "virtual" challenge I'll try to solve in this post. I'm using addresses from the
private ranges to make my live easier for the demo but address in 10.x.x.x and 172.x.x.x must be viewed as routable address. 192.168.x.x are used for private network, like the LAN.
I have an OVH dedicated server with address 10.99.99.99/254 and its gateway at 10.99.99.254. OVH gives me a RIPE block of 8 addresses: 10.10.10.8/29 with the gateway at 10.10.10.14. I also have 2 single failover IPs 172.16.16.16/32 and 172.17.17.17/32.
The RIPE block can be used in 2 different ways.
- The normal way is to use it as a subnet, with first address of the block reserved for the network and the last one for the broadcast address. Including the gateway address that is already allocated to an OVH router, this make 3 addresses unusable. If you have a /30 block (4 addresses) this make only one usable address for your host(s). The advantage of this setup is the simplicity of the network configuration of the hosts themselves.
- The other possibility is to use each address individually with a netmask of /32. You don't need to split your RIPE block in the OVH manager to works that way (this is what OVH say), just use each address like a single failover IP. When doing this, even if VMs are on the same switch, they are not on the same subnet anymore and traffic between them has to travel up to the default gateway and back. If you want a more direct path, you have to create a route between your VMs (see below). Also I thing this is better to use the RIPE gateway 10.10.10.10.14 than using the gateway of the physical host (10.99.99.254) because when moving the VMs and the RIPE block to another host, you don't need to change the VMs gateway. The inconvenient of this choice is that you have to configure your host network using the OVH guide (french).
Simple solution for the RIPE block
In this simple setup, I don't give any routable address to the firewall. The early setup must be done with the help of a VM installed on the LAN side.
First we need to enable and setup the WAN and DMZ (OPT1) interfaces to none. We will not attach any IP addresses to these interfaces (this time). We will bridge them. Bridge works one level below the Internet protocol and don't need any IP settings.
Then we are creating the bridge :
And setup the two members of the bridge using
ctrl-click. This is the most difficult part :-)
The setup is done. Yes don't be afraid this is enough. Now we have to setup the filter rules. I give you some sample rules, but use your owns.
First I like to be able to ping in any direction, at least for the setup and troubleshooting.
Here are the details :
I want to give unrestricted internet access to VMs in the DMZ. Anyway I'm adding a restriction for the LAN. The DMZ can be accessed by the internet (
demilitarized zone) and can be compromised. This is why the DMZ cannot have more access rights to access the LAN than the Internet.
Here are all the details :
Now I suppose I want to host a mail server on 10.10.10.9 and need to let SMTP packets go in..
Here are the details of the SMTP setup.
Now the most important part is the network setup of 10.10.10.9. Nothing difficult anyway :
IP_ADDR=10.10.10.9
NETMASK=255.255.255.248 (/29)
GATEWAY=10.10.10.14
Network setup for other hosts of the RIPE block are similar.
Add a single failover IP to the DMZ
Now I want to add a host with a single failover IP
172.16.16.16/32 to the DMZ. I just need to setup the filter rules like the SMTP rule above for this new host. Nothing more is required because we are working in bridge mode.
On the other hand, the setup of the host itself is more tricky, not because of the firewall, but because of how failover IP works. Follow the OVH
guide (
french) to setup your new host using 172.16.16.16 as the failover IP and 10.99.99.254 for the gateway (the one ending in .254).
In this configuration, traffics between 10.10.10.9 and 172.16.16.16 has to go up to the OVH router and then back to the destination. In both case the traffic has to pass through the firewall that must have a rules to let the traffic goes out and in. This is because hosts ignore they are side by side. If you expect to have a lot of traffics and want to speed it up, you have to add routes between the hosts themselves. Don't think that the fact that your traffics between host inside the DMZ goes trough the firewall increase the security. If a pirate is able to hack one of your VM inside the DMZ, he is able to bypass the firewall to attack your other hosts too.
Here are sample command lines for linux and windows. You have to hard-code these routes in the hosts configurations.
On 172.16.16.16, add a route to network 10.10.10.8/29
linux: route add -net 10.10.10.8 netmask 255.255.255.248 dev eth0
windows: route -p ADD 10.10.10.8 MASK 255.255.255.248 172.16.16.16
On 10.10.10.9 add a route to host 172.16.16.16/32
linux: route add -host 172.16.16.16 netmask 255.255.255.255 dev eth0
windows: route -p ADD 172.16.16.16 MASK 255.255.255.255 10.10.10.9
Attach an IP to the WAN side
This makes the firewall remotely manageable and allows to give an internet access to the LAN side.
I choose
10.10.10.13/29 from the RIPE block, in the next section I explain how to use a single failover IP instead.
I go to the WAN interface configuration to setup the IP and its gateway at once.
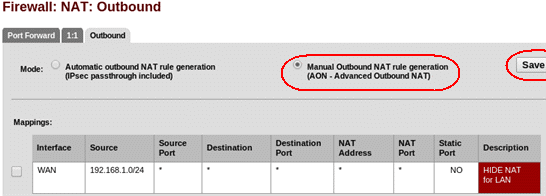
Now I masquerade the LAN addresses using hide NAT to give Internet access to the LAN side. Don't forget to switch to manual, I don't want to NAT hosts in the DMZ.
The details:
I also need to check that the LAN has a rule that give access to the internet :
Done !
If you want, you can forward some ports to hosts inside the LAN.
You can reach host in the DMZ from LAN.
Attach a single failover IP to the WAN side
If you don't have a RIPE block or prefer to use a single failover IP instead, then read this section.
This setup cannot be configured easily using the pfSense GUI interface, some tricks are required.
Here is the plan, first get an Internet access using some hand written command lines. Then download and install the
Shellcmd package. Finally hard code the command line to make the setup persistent.
First setup the WAN IP without any gateway :
Then setup the default gateway manually. I choose to use the
Command Prompt interface of the GUI. Use the two commands :
route add -net 10.99.99.254/32 -iface em0
route add default 10.99.99.254
If you don't know where 10.99.99.254 is coming from, re-read the beginning of this article.
Don't forget to setup a working DNS to have a fully working internet connection. I choose the Google public DNS.
Now the firewall should have internet access and we can install package
Shellcmd.
Then hard code the two commands above inside
Shellcmd to get the make config persistent.
You can try to reboot, just to see if the config works and setup
hide NAT for the LAN side as explained above.
Funny things
It looks like the OVH gateway works like an universal ARP proxy or Captive portal. I means my OVH gateway replies to any ARP request. This means that for any given a.b.c.d/32 failover IP, I can setup a host or virtual host using a mask /24 (instead of /32) and a.b.c.X where X can be anything not in ( 0, 255 or d ) for my gateway.And it works on my Kimsufi server.
I think this is how OVH setup some (maybe all) of their routers to be able to support migration of failover IP or block without too much headache.
What is fun is to traceroute some IPs in a.b.c.* and see that they are not directly attached to the WAN but are behind some routers.
OVH don't say anything about this setup and then this feature is funny but cannot be used on a production server.
Be careful if you use a wrong setup and generate a lot of unexpected ARP requests, OVH monitor ARP request and can warn you to quickly fix the problem or even disable your network link.
Conclusion
For me the use of the bridge is a brilliant idea. The setup is simple. You can add hosts , IPs and RIPE blocks easily to the DMZ.